
시작

realm - expo 호환성 차트

Home.js
이전글
리엑트 네비게이션, 스타일컴포넌트 , 설치
#리엑트 네비게이션 설치
npm install @react-navigation/native

#의존성 모듈 설치
npx expo install react-native-screens react-native-safe-area-context

#for ios
npx pod-install ios
리엑트 네비게이션 설치 후 오류가 있다면 여기를 참조해보자.
리엑트 네비게이션에 대한 정리는 여기 해두었다.
npm install @react-navigation/native-stack# with npm
npm install --save styled-components
or
# with yarn
yarn add styled-componentsstyled-components 적용하는 자세한 방법은 여기서 확인할 수 있다.
스타일컴포넌트에 있는 Props 자동완성기능으로 보려면
npm install @types/styled-components @types/styled-components-react-native
* 설치 후, package.json 에 잘 등록되었는지 확인한다.
MongoDB 와 연결하기위한 realm SDK 설치
아직은 아니지만, 조만간 사용할 것이므로 미리 설치한다. 이전에 설치할 때 버전 호환성으로 애를 먹어서 미리 하는 것이 좋을 것 같아 적어두었다.
package.json 파일을 열고 expo , react-native 버전을 확인 한 뒤 적절한 realm 버전을 선택하도록 한다.
호환성 차트는 여기서 확인 할 수 있다. 현재 expo: ~47 , react-native:0.70 node : 16.x 이므로 11.3.1 을 설치 하였다.
npm install realm@11.3.1

#for only ios
cd ios && pod install && cd ..
그리고 Splash Screen 설치
expo AppLoading은 expo 45에서 deprecated 되었으므로, Splash screen을 설치해야한다.
npx expo install expo-splash-screen
App.js
import { NavigationContainer } from "@react-navigation/native";
import React from "react";
import Navigator from "./navigator";

export default function App() {
  return (
    <NavigationContainer>
      <Navigator />
    </NavigationContainer>
  );
}
navigator.js
import { createNativeStackNavigator } from "@react-navigation/native-stack";
import Home from "./screen/Home";
import Write from "./screen/Write";
const Tabs = createNativeStackNavigator();
const Navigator = () => (
<Tabs.Navigator screenOptions={{ headerShown: false, presentation: "modal" }}>
<Tabs.Screen name="Home" component={Home}></Tabs.Screen>
<Tabs.Screen name="Write" component={Write}></Tabs.Screen>
</Tabs.Navigator>
);
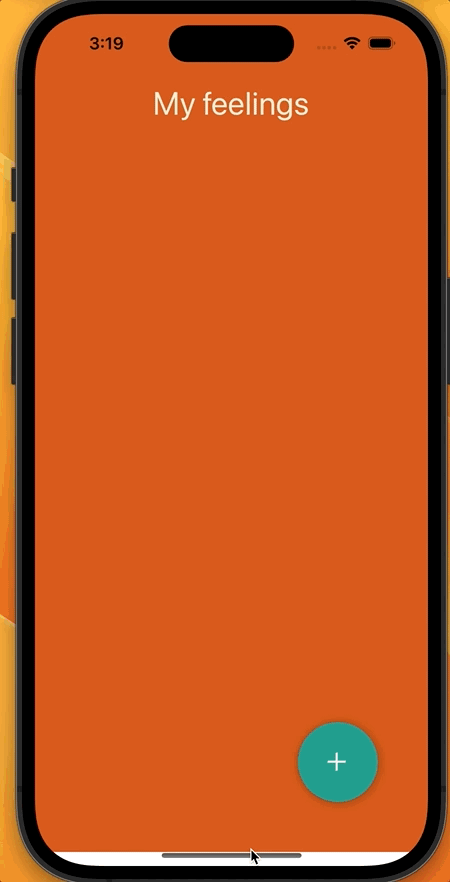
export default Navigator;Home.js
import React from "react";
import { Ionicons } from "@expo/vector-icons";
import styled from "styled-components";
import colors from "../colors";

const View = styled.View`
  flex: 1;
  padding: 0px 30px;
  padding-top: 100px;
  background-color: ${colors.bgColor};
`;
const Title = styled.Text`
  color: ${colors.textColor};
  font-size: 36px;
  margin-top: 50px;
  text-align: center;
  font-weight: 500;
`;

const Btn = styled.TouchableOpacity`
  position: absolute;
  bottom: 50px;
  right: 50px;
  width: 80px;
  height: 80px;
  border-radius: 40px;
  justify-content: center;
  align-items: center;
  background-color: ${colors.btnColor};
  elevation: 5; //for android
  box-shadow: 1px 1px 5px rgba(0, 0, 0, 0.5);
`;
const BtnText = styled.Text`
  color: white;
`;

const Home = ({ navigation: { navigate } }) => (
  <View>
    <Title>My journal</Title>
    <Btn onPress={() => navigate("Write")}>
      <BtnText>Write</BtnText>
      <Ionicons name="add" color="white" size={40} />
    </Btn>
  </View>
);
export default Home;
Write.js
import React, { useState } from "react";
import { Alert } from "react-native";
import styled from "styled-components/native";
import colors from "../colors";

const View = styled.View`
  background-color: ${colors.bgColor};
  flex: 1;
  padding: 0px 30px;
`;
const Title = styled.Text`
  color: ${colors.textColor};
  margin: 50px 0px;
  text-align: center;
  font-size: 28px;
  font-weight: 500;
`;


const emotions = ["🤯", "🥲", "🤬", "🤗", "🥰", "😊", "🤩"];
const Write = () => {

  return (
    <View>
      <Title>Write</Title>

    </View>
  );
};
export default Write;
다음글
2023.02.14 - [개발로그/ReactNative] - 다이어리 앱을 만들면서 연습해보자. - mongoDB 연동(Realm open/스키마 정의 하기)
끝
728x90
'개발로그 > ReactNative' 카테고리의 다른 글
| 다이어리 앱을 만들면서 연습해보자. - Write 화면 구현하기 (0) | 2023.02.17 |
|---|---|
| react-native 에서 아이콘 표시하는 두가지 방법 (0) | 2023.02.16 |
| <View> 의 onLayout 을 사용하면서 <NavigationContainer>와도 공존하기 (0) | 2023.02.16 |
| 다이어리 앱을 만들면서 연습해보자. - mongoDB 연동(Realm open/스키마 정의 하기) (0) | 2023.02.14 |
| [앱 배포] ReactNative로 개발 IOS 첫 빌드 및 배포 방법 정리 (0) | 2023.02.12 |
| ios splash 화면 만들기 (react-native-splash-screen 이용) (0) | 2023.02.08 |
| 아이폰 디바이스별 해상도 정리 (0) | 2023.02.08 |
| 시뮬레이터를 지정해서 테스트 하는 방법 (0) | 2023.02.08 |


댓글